What will you build
In this tutorial you will learn how to integrate Bootstrap tags input and Twitter Typeahead in Bootstrap 4 by creating a simple application which has a single form input to take the values from the user after asking the type of fruits the user likes.
Project Preparation
Create a new project folder (you can name it BootstrapTT) inside your web folder with mkdir command as follows.
$ mkdir BootstrapTT
Navigate to the BootstrapTT folder and create two other folders to store CSS and JavaScript files.
$ cd BootstrapTT
$ mkdir css js
Create the start page of the application with touch command and name it index.html
$ touch index.html
You can also change the ownership of your project files to the web server user with chown command as follows.
$ chown -R www-data .
You can verify the content of your project files with the ls command.
$ ls
And the output will be
css index.html js
Adding Bootstrap 4
Open the project in the editor, you can use any editor of your choice but I recommend you to use VS Code.If you don’t have it, have a look at this article on how to install and configure VS Code.
To open the project with VS Code you can use the code command when you are on the project path as follows.
$ code .
We need to add Bootstrap 4 CSS, Javascript and Font Awesome CDN to the project, and since it is a simple application we can add it on the index.html page.
Add these statements to index.html file which will add the basic HTML layout with a head and title as well as the Bootstrap and Font Awesome CDNs.
<!DOCTYPE html>
<html lang="en">
	<head>
		<meta charset="UTF-8">
		<meta name="viewport" content="width=device-width, initial scale=1.0">
		<meta http-equiv="X-UA-Compatible" content="ie=edge">
		<title>Bootstrap 4 Tags Input with Typeahead</title>
		<link rel="stylesheet" href="https://stackpath.bootstrapcdn.com/bootstrap/4.4.1/css/bootstrap.min.css" integrity="sha384-Vkoo8x4CGsO3+Hhxv8T/Q5PaXtkKtu6ug5TOeNV6gBiFeWPGFN9MuhOf23Q9Ifjh" crossorigin="anonymous">
		<link rel="stylesheet" href="https://use.fontawesome.com/releases/v5.8.1/css/all.css" integrity="sha384-50oBUHEmvpQ+1lW4y57PTFmhCaXp0ML5d60M1M7uH2+nqUivzIebhndOJK28anvf" crossorigin="anonymous">
	</head>
	<body>
		<script src="https://code.jquery.com/jquery-3.4.1.slim.min.js" integrity="sha384-J6qa4849blE2+poT4WnyKhv5vZF5SrPo0iEjwBvKU7imGFAV0wwj1yYfoRSJoZ+n" crossorigin="anonymous"></script>
		<script src="https://cdn.jsdelivr.net/npm/[email protected]/dist/umd/popper.min.js" integrity="sha384-Q6E9RHvbIyZFJoft+2mJbHaEWldlvI9IOYy5n3zV9zzTtmI3UksdQRVvoxMfooAo" crossorigin="anonymous"></script>
		<script src="https://stackpath.bootstrapcdn.com/bootstrap/4.4.1/js/bootstrap.min.js" integrity="sha384-wfSDF2E50Y2D1uUdj0O3uMBJnjuUD4Ih7YwaYd1iqfktj0Uod8GCExl3Og8ifwB6" crossorigin="anonymous"></script>
	</body>
</html>
Adding Form Input
We need to have the form input which will accept the value from the user and pass it to the JavaScript for Typeahead to show the appropriate list of fruits for a user to select.
Add these statements in index.html inside the body section.
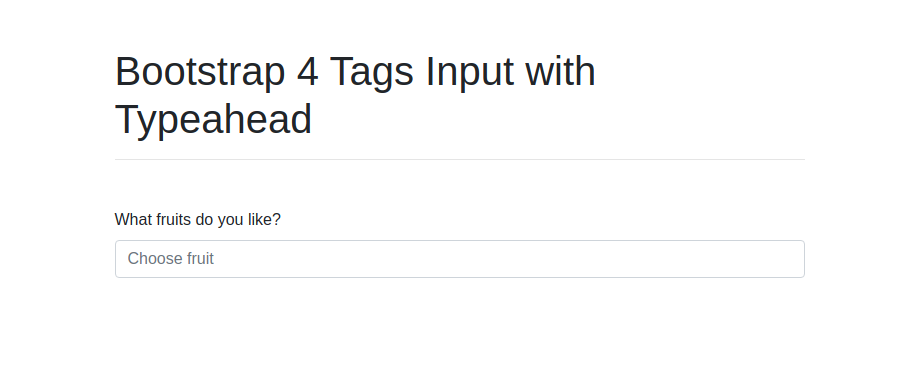
<div class="container mt-5">
	<div class="row">
		<div class="col">
			<h1>Bootstrap 4 Tags Input with Typeahead</h1>
			<hr />
			<div class="form-group mt-5">
				<label for="fruits">What fruits do you like?</label>
				<input type="text" class="form-control" id="fruits" placeholder="Choose fruit">
			</div>
		</div>
	</div>
</div>
You can navigate to the browser and access your app, you will see the output like this
Adding Bootstrap Tags and Typeahead Libraries
Bootstrap Tags Input
Create the new file under js directory and name it bootstrap-tagsinput.js, then copy the content of this file bootstrap-tagsinput.js and paste them on the new created file.
In the body section of the index.html page add the following statement after the statement which includes Bootstrap JavaScript CDN.
<script src="js/bootstrap-tagsinput.js"></script>
Twitter Typeahead
Create the new file under js directory and name it typeahead.js, then copy the content of this file typeahead.js and paste them on the new created file.
In the body section of the index.html page, add this statement after the statement which includes bootstrap-tagsinput script.
<script src="js/typeahead.js"></script>
CSS Style
Create a new file in the css folder and name it style.css. This file will have the CSS for both bootstrap tag input, typeahead and other css which we will add later.
Add the following statements to the file and save it.
/* Bootstrap TagsInput */
.bootstrap-tagsinput {
	display: inline-block;
	vertical-align: middle;
	width: 100%;
	border: 1px solid;
}

.bootstrap-tagsinput input {
	direction: ltr;
	border: 0;
	outline: 0;
	background-color: transparent;
	padding: 7px 0;
	margin-top: 3px;
	margin-bottom: 3px;
	width: auto !important;
	min-width: 100px;
	-webkit-box-shadow: none;
	box-shadow: none;
}

.bootstrap-tagsinput input:focus {
	border: none;
	box-shadow: none;
}

.bootstrap-tagsinput .twitter-typeahead {
	width: auto;
}

.bootstrap-tagsinput .tt-dropdown-menu {
	margin-top: 5px;
	min-width: 200px;
}

.bootstrap-tagsinput .tag {
	margin-top: 3px;
	margin-bottom: 3px;
	margin-right: 6px;
	border: 0;
	border-radius: 100px;
	padding: 7px 14px;
	padding-right: 33px;
	float: left;
	font-size: 12px;
	line-height: 1.6666667;
	font-weight: 400;
	text-transform: none;
	position: relative;
}

.bootstrap-tagsinput .tag:not([class*=bg-]) {
	background-color: #03A9F4;
	color: #fff;
}

.bootstrap-tagsinput .tag [data-role="remove"] {
	cursor: pointer;
	position: absolute;
	top: 50%;
	right: 14px;
	line-height: 1;
	margin-top: -5.5px;
	opacity: 0.7;
	filter: alpha(opacity=70);
}

.bootstrap-tagsinput .tag [data-role="remove"]:hover {
	opacity: 1;
	filter: alpha(opacity=100);
}

.bootstrap-tagsinput .tag [data-role="remove"]:after {
	font-family: "Font Awesome 5 Free";
    content: "\f00d";
    font-weight: 900;
	font-size: 11px;
	color: #fff;
	-webkit-font-smoothing: antialiased;
	-moz-osx-font-smoothing: grayscale;
}

/* Twitter Typeahead */
.twitter-typeahead {
	width: 100%;
}

.typeahead,
.tt-query,
.tt-hint {
	outline: 0;
}

.tt-hint {
	color: #999;
}

.tt-menu {
	width: 100%;
	margin-top: 1px;
	min-width: 180px;
	padding: 8px 0;
	background-color: #fff;
	border: 1px solid transparent;
	border-radius: 3px;
	max-height: 300px;
	overflow-y: auto;
	-webkit-box-shadow: 0 3px 6px rgba(0, 0, 0, 0.16), 0 3px 6px rgba(0, 0, 0, 0.23);
	box-shadow: 0 3px 6px rgba(0, 0, 0, 0.16), 0 3px 6px rgba(0, 0, 0, 0.23);
}

.typeahead-scrollable .tt-menu {
	max-height: 250px;
}

.typeahead-rtl .tt-menu {
	text-align: right;
}

.tt-suggestion {
	padding: 8px 15px;
	cursor: pointer;
}

.tt-suggestion:hover,
.tt-suggestion:focus,
.tt-suggestion.tt-cursor {
	background-color: #f5f5f5;
}

.tt-dataset-group .tt-suggestion {
	padding-left: 32px;
	padding-right: 32px;
}

.tt-heading {
	font-size: 11px;
	line-height: 1.82;
	padding: 8px 15px;
	text-transform: uppercase;
	display: block;
	font-weight: 700;
	margin-top: 2px;
	margin-bottom: 2px;
}

.typeahead-template .empty-message {
	padding: 8px 15px;
	text-align: center;
}
In the head section of the index.html file add the following statement after the statement which adds Font Awesome CDN.
<link rel="stylesheet" href="css/style.css">
You can view the changes you made by navigating to the browser and access your app, you will see the output like this;
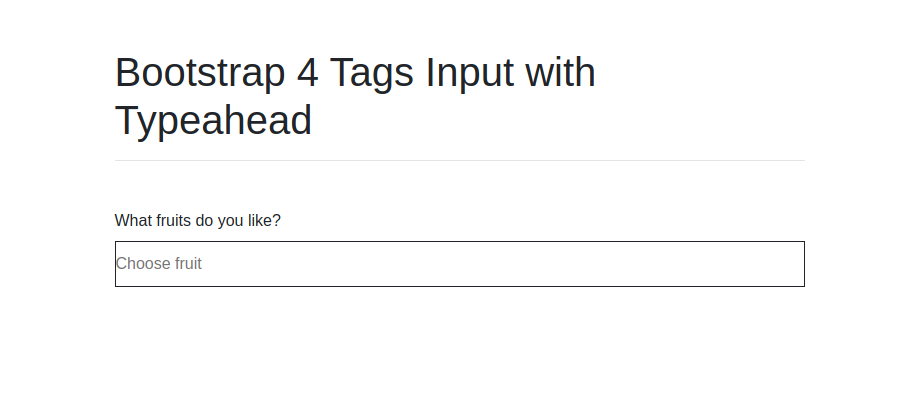
Nice, the form input now has the border.
Handling Form Input
What is remaining now is to handle the form input to accept the value from the user and list the fruits for the user to choose. We will use jQuery to do that.
Create a new file in the js folder and name it app.js
Add the following statements to the file and save it.
var fruits = ['Apples', 'Avocado', 'Bananas', 'Blackberries', 'Blueberries',
                'Cherries', 'Cranberries', 'Durian', 'Grapefruit', 'Grapes',
                'Guava', 'Lemons', 'Mango', 'Olives', 'Oranges', 'Papaya',
                'Pineapple', 'Pomegranate', 'Strawberries', 'Watermelon'];

var substringMatcher = function(strs) {
    return function findMatches(q, cb) {
        var matches;
        matches = [];
        substrRegex = new RegExp(q, 'i');
        $.each(strs, function(i, str) {
            if (substrRegex.test(str)) {
                matches.push(str);
            }
        });
        cb(matches);
    };
};

$('#fruits').tagsinput({
    typeaheadjs:({
        hint: true,
        highlight: true,
        minLength: 1
    }, {
        name: 'fruits',
        source: substringMatcher(fruits)
    })
});
As you can see in the statements, first we initialize the list of fruits and assign it to the fruits variable.
Then we define the substringMatcher function, this function will be called when the user enters any key on the form input and it will try to match the key value with the name of each fruit in the list and return the appropriate fruits list.
Lastly we handle the form input with jQuery through its id value of #fruits, then we attach it to the tagsinput, which call typeahead with some few options.
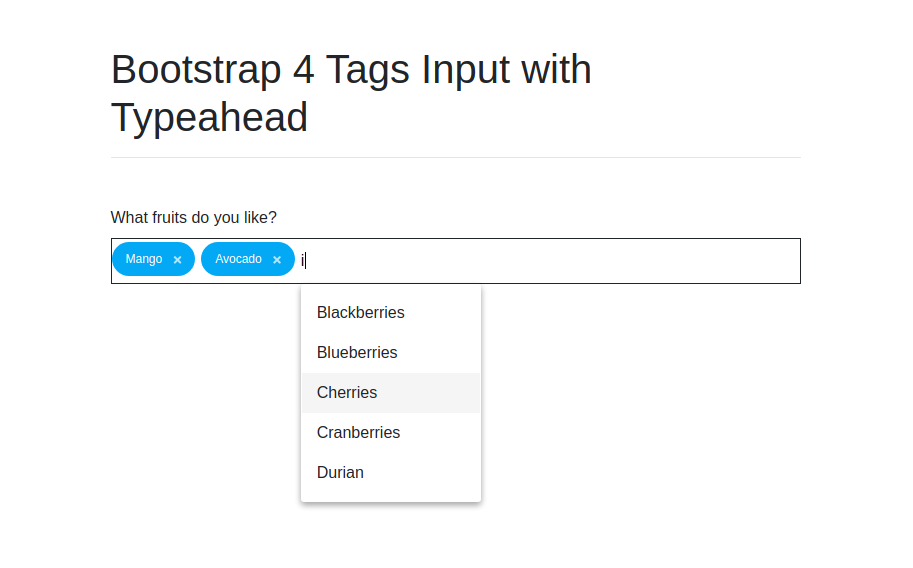
Navigate to your browser and try to enter some fruit name on the form input, the list of fruits will be shown, and when you click it, it will be added on the form input like this.
If you want to store or process further the values of form input chosen by the user, you can use jQuery val() method as follows.
var fruits_choice = $('#fruits).val();Codekutu Styles
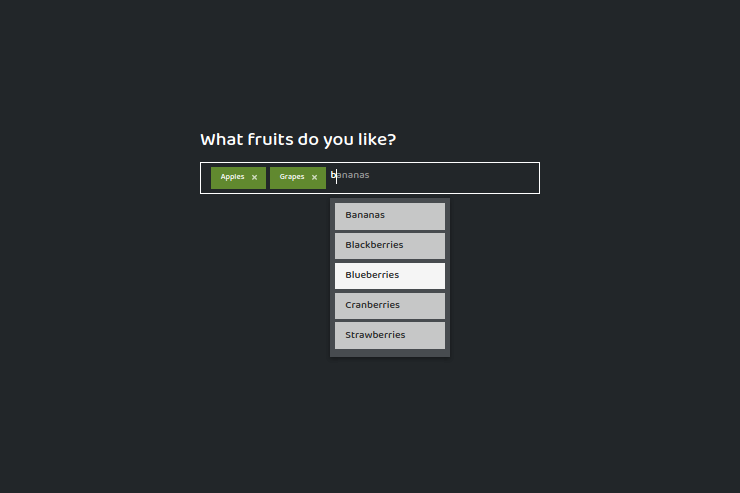
Our simple application is already done, but let us make the UI to look a little bit prettier. Mostly we will change the color of body background, heading, form input, tags label and so more.
Open style.css file which is inside the css folder and add the following statements at the end of the file.
/* Codekutu */
body {
	background: #222629;
	font-family: 'Baloo Tamma 2', cursive;
}

h1 {
	color: #86c232;
	font-weight: bold;
}

input {
	color: #fff;
}

.form-group label {
	color: #fff;
	font-size: 1.8rem;
}

hr {
	border-color: #474B4F;
}

.bootstrap-tagsinput {
	border-color: #fff;
	padding-left: 1rem;
	padding-right: 1rem;
	color: #6B6E70;
}

.bootstrap-tagsinput .tag {
	margin-top: 0.4rem;
	margin-bottom: 0.4rem;
	border-radius: 0 !important;
}

.bootstrap-tagsinput .tag:not([class*=bg-]) {
	background-color: #61892F;
	color: #FFF;
}

.tt-menu {
	margin-top: .7rem;
	padding: .4rem;
	border-radius: 0 !important;
    background-color: #474B4F;
}

.tt-suggestion {
	background: #c6c7c7;
	color: #272727;
	margin-bottom: .3rem;
}
Open the application on the browser and you will see something like this.

You an see the working demo of this application through the following link Bootstrap 4 Tags Input with Typeahead Demo.
Also, you can find the full source code of the application on the following repository Bootstrap 4 Tags Input with Typeahead Source Codes.


Nice one
Very nice. I’m a newbie and I want to the input field look like the normal bootstrap input field with rounded corners. And I wondered that the example won’t work with bootstrap validation.
You can add the border radius style to the bootstrap tags input. For example
.bootstrap-tagsinput {border-radius: 8px;
}